
A Guide to Connecting GitHub with Jenkins


Connecting GitHub with Jenkins is a classic powerhouse pairing in the DevOps world. It hooks up your source control directly to your automation server, turning every code commit and pull request into a trigger for builds, tests, and even deployments. This integration is all about bridging that age-old gap between development and operations, making your entire software delivery pipeline faster and a whole lot more reliable.
Why Bother Connecting GitHub With Jenkins?

When you link GitHub’s top-tier source code management with Jenkins' automation muscle, you create a truly seamless continuous integration workflow. Every git push or newly opened pull request can automatically kick off a chain of events you’ve defined. What used to be a manual, error-prone chore becomes a consistent, hands-off process.
The real win here is catching bugs much, much earlier. Imagine setting up a pipeline that instantly runs all your unit tests on every single pull request. Developers get immediate feedback right inside the GitHub UI, stopping buggy code dead in its tracks before it ever has a chance to mess up your main branch.
The Power of a Flexible CI Engine
Now, you might be thinking about all-in-one platforms like GitHub Actions, and they certainly have their place. But Jenkins brings a level of flexibility and control that’s hard to beat. Its plugin ecosystem is massive—we're talking over 1,900 available plugins—which lets you customize your pipelines to an incredible degree.
This is a game-changer for organizations with specific needs, like:
- Complex Testing Needs: If your QA process involves a tangled web of different test suites, environments, or specialized third-party tools, Jenkins can orchestrate it all without breaking a sweat.
- Legacy System Integration: Lots of companies still rely on older, on-premise systems. Jenkins is a master at talking to these environments where newer, cloud-native tools often fall short.
- Hybrid Cloud Environments: For teams juggling infrastructure across AWS, Azure, GCP, and their own data centers, Jenkins serves as the perfect central command hub for automation.
At its heart, this integration is all about creating a tight, rapid feedback loop. When developers can see the results of their CI builds without ever leaving the GitHub interface, it stops feeling like a separate, clunky process and becomes a natural part of their daily workflow.
Ultimately, the benefits of continuous integration aren't just about automation for automation's sake. It's about boosting your team's velocity and shipping higher-quality code. By connecting GitHub with Jenkins, you're laying the groundwork for a reliable and scalable delivery process that's built to handle your team's unique challenges.
Laying the Groundwork for Integration
Before you can bridge the gap between your code and your automation server, a little prep work goes a long way. Think of it as a pre-flight checklist for connecting GitHub with Jenkins. Getting these foundational pieces right from the start will save you a ton of headaches later on.
First up, let's get things in order on the GitHub side. Your repository needs to grant Jenkins just enough permission to pull code and report back on build statuses. A huge pro tip here is to create a dedicated service account or machine user in GitHub specifically for Jenkins. It's a common misstep to use a personal account, but that opens the door to security risks and access problems if that person ever leaves the team.
Using a dedicated service account is all about the principle of least privilege. It ensures Jenkins has the exact permissions it needs to do its job—nothing more. You can also get more granular with repository access by using a CODEOWNERS file, which you can learn more about in our guide.
Checking Your Jenkins Plugins
With GitHub ready, let's pivot to Jenkins. The real power of Jenkins comes from its massive ecosystem of plugins, and for a solid GitHub with Jenkins setup, two of them are absolutely non-negotiable:
- Git Plugin: This is the core engine that lets Jenkins pull source code from any Git repository, including those hosted on GitHub.
- GitHub Integration Plugin: This one builds on the basics, unlocking deeper connections like automatically kicking off builds with webhooks and updating pull request statuses right in the GitHub UI.
Jenkins boasts a library of over 1,900 plugins, yet the Git plugin consistently ranks as one of the most installed, powering 30-40% of all Jenkins instances globally. That number alone shows just how fundamental this connection is for CI pipelines everywhere. You can actually dig into more detailed infrastructure usage stats if you're curious.
If you're spinning up a new server, pop over to the "Manage Jenkins" > "Manage Plugins" dashboard to make sure both of these are installed and up to date.
Configuring the GitHub to Jenkins Connection
With your environment ready, it’s time to build the secure bridge that connects GitHub with Jenkins. This whole setup hinges on two critical pieces: a secure credential that lets Jenkins into your GitHub repos and a webhook that tells Jenkins when to spring into action. Nailing this configuration is the cornerstone of a truly automated, event-driven CI process.
First up, we need to create a Personal Access Token (PAT) over in GitHub. Think of this token as a special password just for Jenkins. It's what allows Jenkins to securely clone your repository and, just as importantly, update commit statuses after a build. To get one, head to your GitHub settings, then cruise over to "Developer settings," and finally "Personal access tokens."
Establishing Secure Credentials
When you're creating the token, you have to grant it the right "scopes." Giving it too few permissions will cause the integration to fail, but giving it too many opens up a security hole.
For a basic pipeline that just needs to check out code, the repo scope is all you need. This grants Jenkins read/write access to your repositories, which is perfect for pulling code and pushing build statuses back to your pull requests. I always recommend giving your token a clear, descriptive name like jenkins-ci-pat and setting an expiration date. It's just good security hygiene.
Once you have your token, you have to resist the temptation to hardcode it directly into a Jenkins job. Don't do it. That's a massive security flaw. Instead, jump over to your Jenkins dashboard and navigate to "Manage Jenkins" > "Credentials." Here, you'll add the PAT as a "Secret text" credential, giving it a unique ID you can reference later. This keeps the token stored safely and securely.
Properly managing credentials isn't just a "best practice"—it's a critical security measure. The Jenkins Credentials Manager encrypts your secrets, making sure they never get exposed in logs or job configurations. This is absolutely fundamental for protecting your source code.
This infographic gives you a great visual of how GitHub's token authentication and Jenkins' credential management work together.
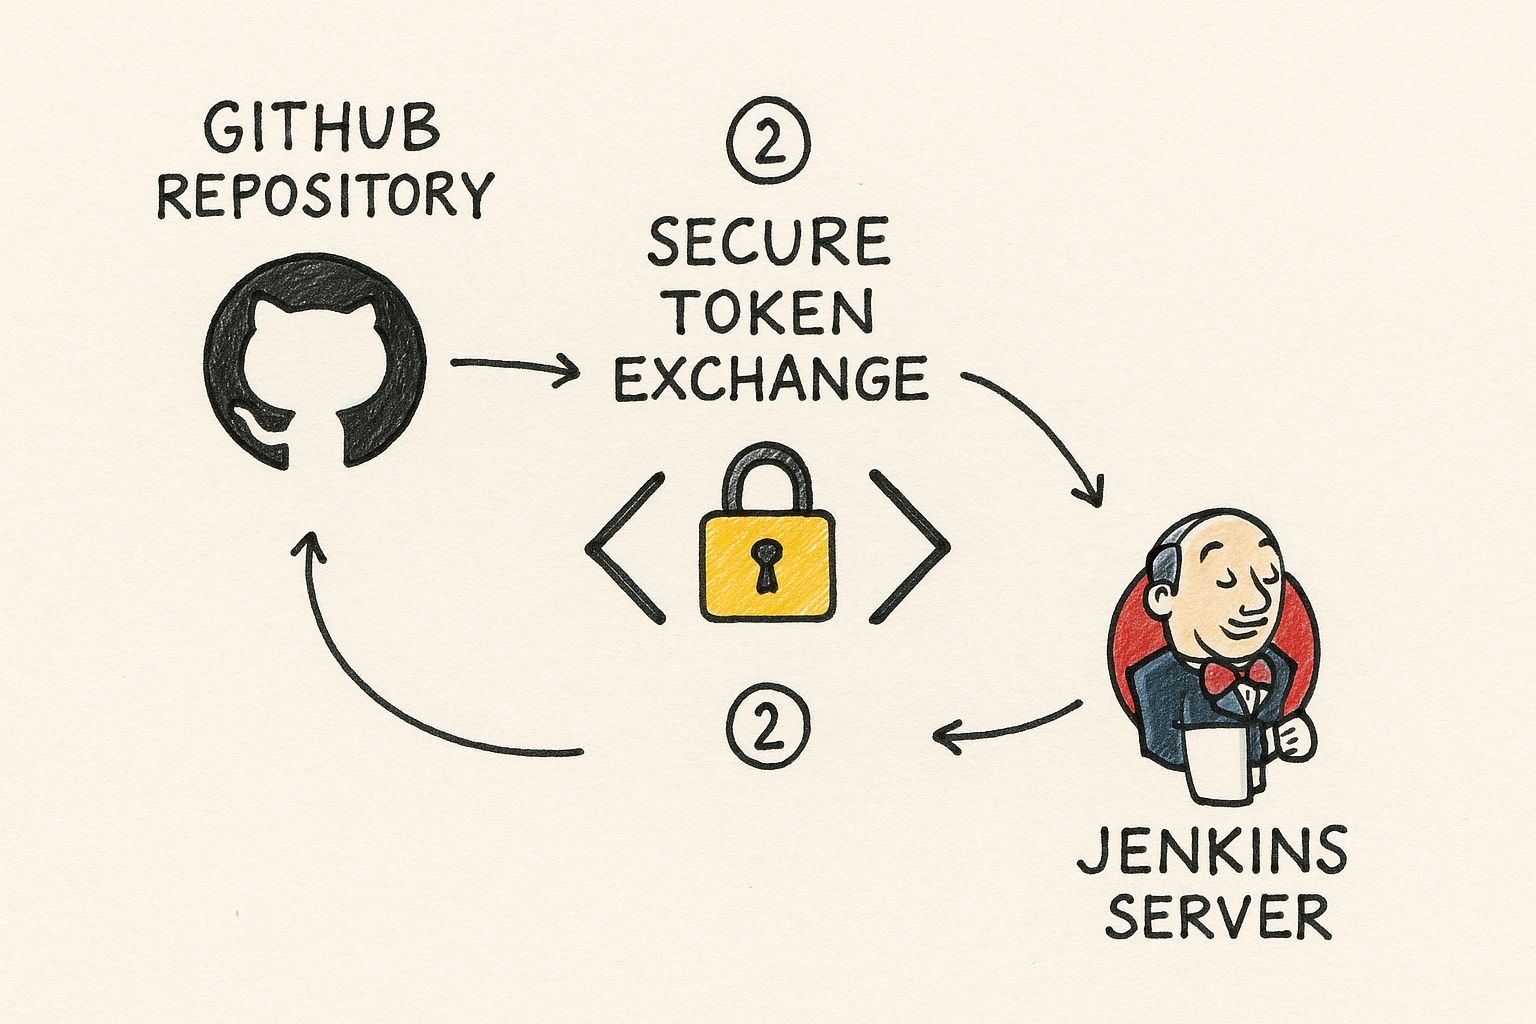
The padlock right in the middle really drives the point home: the connection is built on a secure, trusted exchange, not on leaving sensitive keys lying around.
Activating the Webhook Trigger
With your credentials locked down, the final piece of the puzzle is the webhook. This is the magic that allows GitHub to instantly ping Jenkins whenever something interesting happens, like a git push or a new pull request. In your GitHub repository's settings, find the "Webhooks" section and click to add a new one.
The "Payload URL" field is the most important one here. It has to point directly to your Jenkins server's GitHub webhook endpoint, which almost always follows the format YOUR_JENKINS_URL/github-webhook/. For "Content type," make sure you select application/json.
Finally, you need to tell GitHub which events should trigger this webhook. You could select "Send me everything," but that’s incredibly noisy and inefficient. It's much smarter to pick only the specific events your CI workflow actually cares about. For most teams, that means:
- Pushes: Triggers a build when new commits are pushed to a branch.
- Pull requests: Lets Jenkins run all your tests and checks against new pull requests.
Once you save it, GitHub will fire off a quick test ping to your Jenkins server. If you see a green checkmark, you're golden. Your GitHub with Jenkins connection is officially live and ready to start automating.
Building Your First Jenkinsfile Pipeline
Now that you've got Jenkins and GitHub talking to each other, it's time to actually build something. The modern—and frankly, the only way you should be doing this—is by defining your entire build process as code using a Jenkinsfile.
Think of it as a simple text file that lives right inside your GitHub repository, sitting alongside your application code. No more clicking through endless UI menus to configure a job. Your build logic becomes just another version-controlled part of your codebase, ready to be reviewed, iterated on, and audited. This whole "pipeline-as-code" approach is the bedrock of scalable, repeatable automation.
Anatomy of a Simple Jenkinsfile
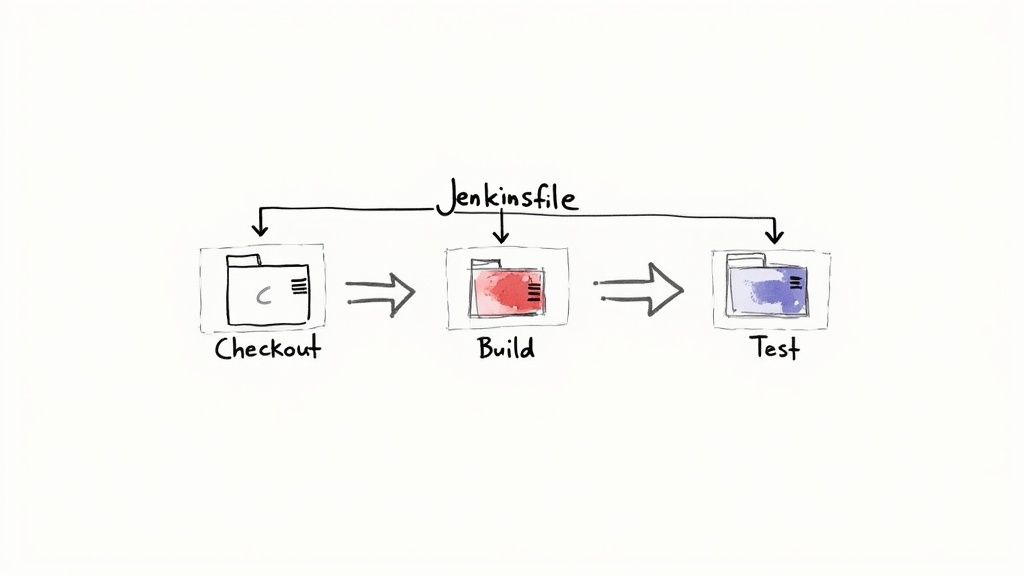
Under the hood, a Jenkinsfile is written in a Groovy-based DSL (Domain-Specific Language). It's all wrapped in a pipeline block, which contains an agent (where the work runs) and a series of stages. Each stage is a logical step in your workflow—checkout, build, test, deploy, you name it.
Here’s a dead-simple, practical example for a Node.js project. You can drop this right into the root of your repository and tweak it for your own stack.
pipeline {
agent any
stages {
    stage('Checkout') {
        steps {
            // This step grabs your code from the GitHub repository
            checkout scm
        }
    }
    stage('Build') {
        steps {
            // A classic for any Node.js project
            sh 'npm install'
        }
    }
    stage('Test') {
        steps {
            // Fire up the test suite
            sh 'npm test'
        }
    }
}
}
What's great about this structure is that it gives you clean, visual feedback right in the Jenkins UI. You can see exactly which stage is running and, more importantly, where things broke. It's a surprisingly intuitive way to get a health check on your build at a glance.
Key Takeaway: By putting your pipeline in a Jenkinsfile, you're creating a single source of truth for your entire build process. It can be branched, reviewed in pull requests, and maintained just like your application code, which is a massive win for consistency and reliability.Jenkins vs. GitHub Actions
It's a common question: "Why use Jenkins when GitHub Actions is right there?" It’s a fair point. Both are powerful tools, but they approach integration from different angles. GitHub Actions is native and event-driven, making simple workflows a breeze. Jenkins, on the other hand, is the king of customization, offering unparalleled extensibility through its massive plugin ecosystem.
Let's break down the core differences in how they handle integration with a GitHub repo.
Jenkins vs GitHub Actions Integration Approach
| Aspect | Jenkins Integration | GitHub Actions |
|---|---|---|
| Setup Process | Requires manual server setup, plugin installation, and webhook configuration. | Native to GitHub. Setup involves creating a YAML file in the .github/workflows directory. |
| Customization | Extremely high. Thousands of plugins allow for deep, complex, and highly specific build pipelines. | Good, but more constrained. Relies on community-created "Actions" from the Marketplace. |
| Infrastructure | Self-hosted or cloud-hosted. You control the hardware, environment, and security completely. | Fully managed by GitHub. Offers hosted runners for Linux, Windows, and macOS. |
| Developer Experience | Can feel disconnected. Developers interact with a separate Jenkins UI, not directly in GitHub. | Tightly integrated. Build logs, status checks, and artifacts are all visible within the GitHub UI. |
Ultimately, GitHub Actions excels at simplicity and a tight developer experience. Jenkins shines when you need deep customization for complex, multi-stage builds, especially in legacy or enterprise environments where you need full control.
To get your Jenkinsfile running, just create a "Pipeline" or "Multibranch Pipeline" job in Jenkins and point it to your GitHub repository. Jenkins is smart enough to find the file and run the stages you’ve laid out.
And if you're ready to move beyond the basics, our guide on creating a comprehensive Jenkins CI/CD pipeline has much more advanced examples to sink your teeth into.
Making Your Workflow Actually Work for You
Alright, with the basic Jenkins and GitHub connection in place, let's talk about some real-world tweaks that will make your life easier. These small adjustments can seriously boost your team's efficiency and keep your server from melting down. This is how you go from a simple setup to a professional CI/CD machine.
A true game-changer is getting Jenkins to report build statuses right back to your GitHub pull requests. This little feedback loop is incredibly powerful. It gives your dev team a green checkmark for a successful build or a red cross for a failure—right inside the PR. No more jumping over to the Jenkins UI to see what happened. The info they need is exactly where they're working.
Smart Build Management and Security
Once your team starts humming along, you'll notice developers pushing multiple commits in a short burst. If every single push kicks off a new build, your Jenkins server is going to get hammered. This is where build batching saves the day.
By enabling the "Quiet period" option in your Jenkins job, you can tell Jenkins to wait a few seconds for more commits before it starts a build. It’s a simple change that saves a ton of compute resources by grouping those rapid-fire pushes into a single run.
Another handy technique is using parameterized builds. This gives you the flexibility to trigger jobs manually with specific inputs, which is perfect for situations like:
- Deploying a specific feature branch to a staging environment.
- Running a massive, time-consuming test suite that you only need to run occasionally, not on every commit.
A quick but critical note on security: opening up Jenkins to receive webhooks from GitHub needs to be done carefully. Never expose your Jenkins instance directly to the public internet. Always put it behind a reverse proxy (like Nginx) and lock down your firewall rules to only allow traffic from GitHub's known IP ranges.
Putting these practices in place ensures your integration is more than just functional—it's efficient, secure, and ready to scale as your team picks up speed. When you focus on these workflow details, you build an automation pipeline that’s not just robust, but actually a pleasure for developers to use.
Got Questions? We've Got Answers
When you're trying to get GitHub and Jenkins to play nice, a few questions always seem to pop up. Let's tackle some of the most common ones I hear, so you can sidestep those early headaches and build a much smoother workflow.
Webhooks vs. SCM Polling
So, what’s the real difference between a webhook and SCM polling? It’s all about push versus pull.
A webhook is a "push" model. The moment you push a commit, GitHub sends an instant notification right over to Jenkins. It's real-time, it's efficient, and it’s exactly what you want for a snappy CI/CD pipeline.
SCM polling, on the other hand, is a "pull" model. Jenkins has to wake up on a schedule you set—say, every five minutes—and ask GitHub, "Anything new?" This creates delays and a bunch of unnecessary network chatter. For a responsive setup, webhooks are always the way to go.
Can Jenkins Handle Multiple Branches?
You bet it can. The absolute best way to manage this is with a "Multibranch Pipeline" job.
When you configure this job type, Jenkins does the heavy lifting for you. It scans your entire GitHub repository, automatically finds every single branch containing a Jenkinsfile, and then creates a dedicated pipeline for each one.
This is a game-changer for managing feature branches, release branches, and your main line of code. It kills the need to manually create a new job every time a developer kicks off new work, making your automation truly scale.
Tired of wrestling with complex CI pipelines and spiraling costs? Mergify’s Merge Queue and CI Insights can dramatically slash your build times and give you crystal-clear visibility into infrastructure bottlenecks. Optimize your CI/CD workflow with Mergify today.


