
Master Jenkins GitHub Integration for Seamless CI/CD


Connecting Jenkins and GitHub is how you get to real Continuous Integration/Continuous Delivery (CI/CD). When you link the most popular open-source automation server with the world's biggest code repository, you're not just connecting tools. You're building an automated workflow that builds, tests, and deploys your code the moment it's committed.
This integration is pretty much the foundation for any modern, efficient software team.
Why Connecting Jenkins and GitHub Is a Game Changer
Pairing Jenkins with GitHub is about more than just checking a box for "automation." It fundamentally changes how your team builds software. You're creating a responsive system where your code repo and automation server are in constant dialogue, cutting out the manual handoffs and slashing the chances of human error.
The real-world impact is something you feel right away. Picture a developer pushing a new feature to a branch. Instead of that code sitting around waiting for a scheduled build or for someone to manually kick one off, GitHub instantly tells Jenkins what happened. Jenkins then spins up a dedicated build and test cycle for that specific change.
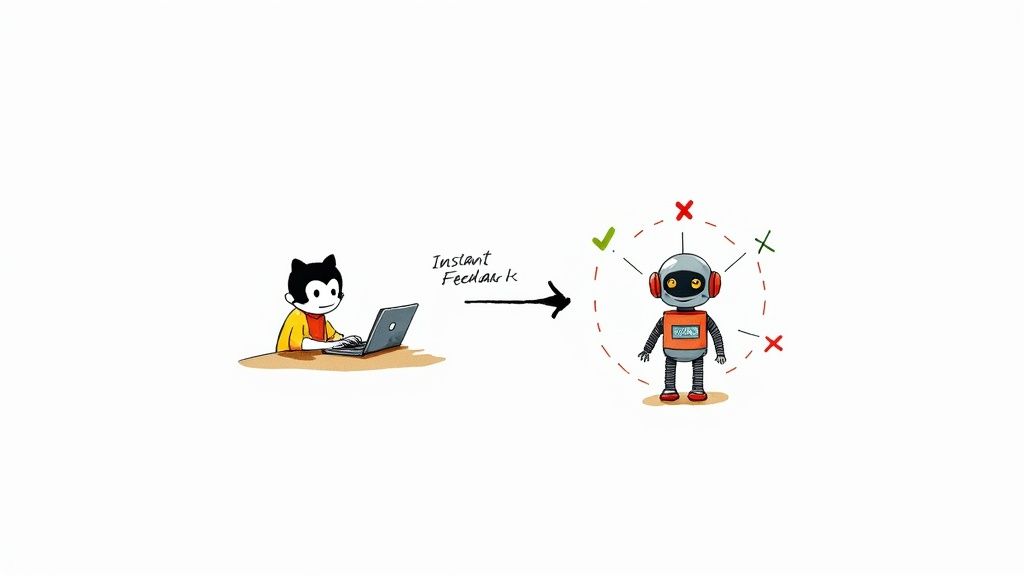
The Power of Immediate Feedback
This instant feedback loop is where the magic really happens. Developers know within minutes if their changes broke the build or flunked a test. This lets them fix issues while the code is still fresh in their minds, which is a massive win. It stops tiny bugs from getting merged into the main branch where they can grow into much bigger, more tangled problems down the road.
A fast feedback loop isn't a luxury; it's a necessity for high-performing teams. The sooner you find a bug, the cheaper and easier it is to fix. Integrating Jenkins and GitHub gives you one of the tightest feedback loops you can get.
Accelerating Delivery and Improving Code Quality
All this automation feeds directly into a faster, more reliable delivery pipeline. By catching problems early and automating the grunt work of the build process, you end up with a much more stable codebase.
This combination of stability and speed is exactly why the Jenkins GitHub integration is a cornerstone for so many successful dev teams. The benefits are crystal clear:
- Faster Development Cycles: Builds get triggered automatically by a
git push. That means less waiting around and more time actually writing code. - Drastically Improved Code Quality: Bugs get caught and squashed at the branch level, long before they can mess things up for the rest of the team.
- Reduced Manual Overhead: Your DevOps engineers can stop babysitting builds and start focusing on bigger things, like improving your infrastructure.
Jenkins' spot at the top of the automation world speaks for itself. It currently holds a 44% market share in the CI/CD space, with around 11.26 million developers using it across all kinds of critical industries. You can dig into more stats on Jenkins' growth and adoption over at CloudBees.
Getting Your Environment Ready for Integration
A rock-solid Jenkins and GitHub integration doesn’t just happen—it's built on a carefully prepared foundation. I’ve seen it time and again: teams skip this prep work and end up with frustrating authentication errors and broken webhooks down the line.
Before we even think about connecting the two, let’s get your environment configured correctly. This is all about setting the right permissions and getting the necessary tools in place. Think of it as laying the groundwork for a smooth, automated workflow. A few minutes of proper setup now will save you hours of troubleshooting later.
This simple infographic gives you a high-level view of the core preparation steps.
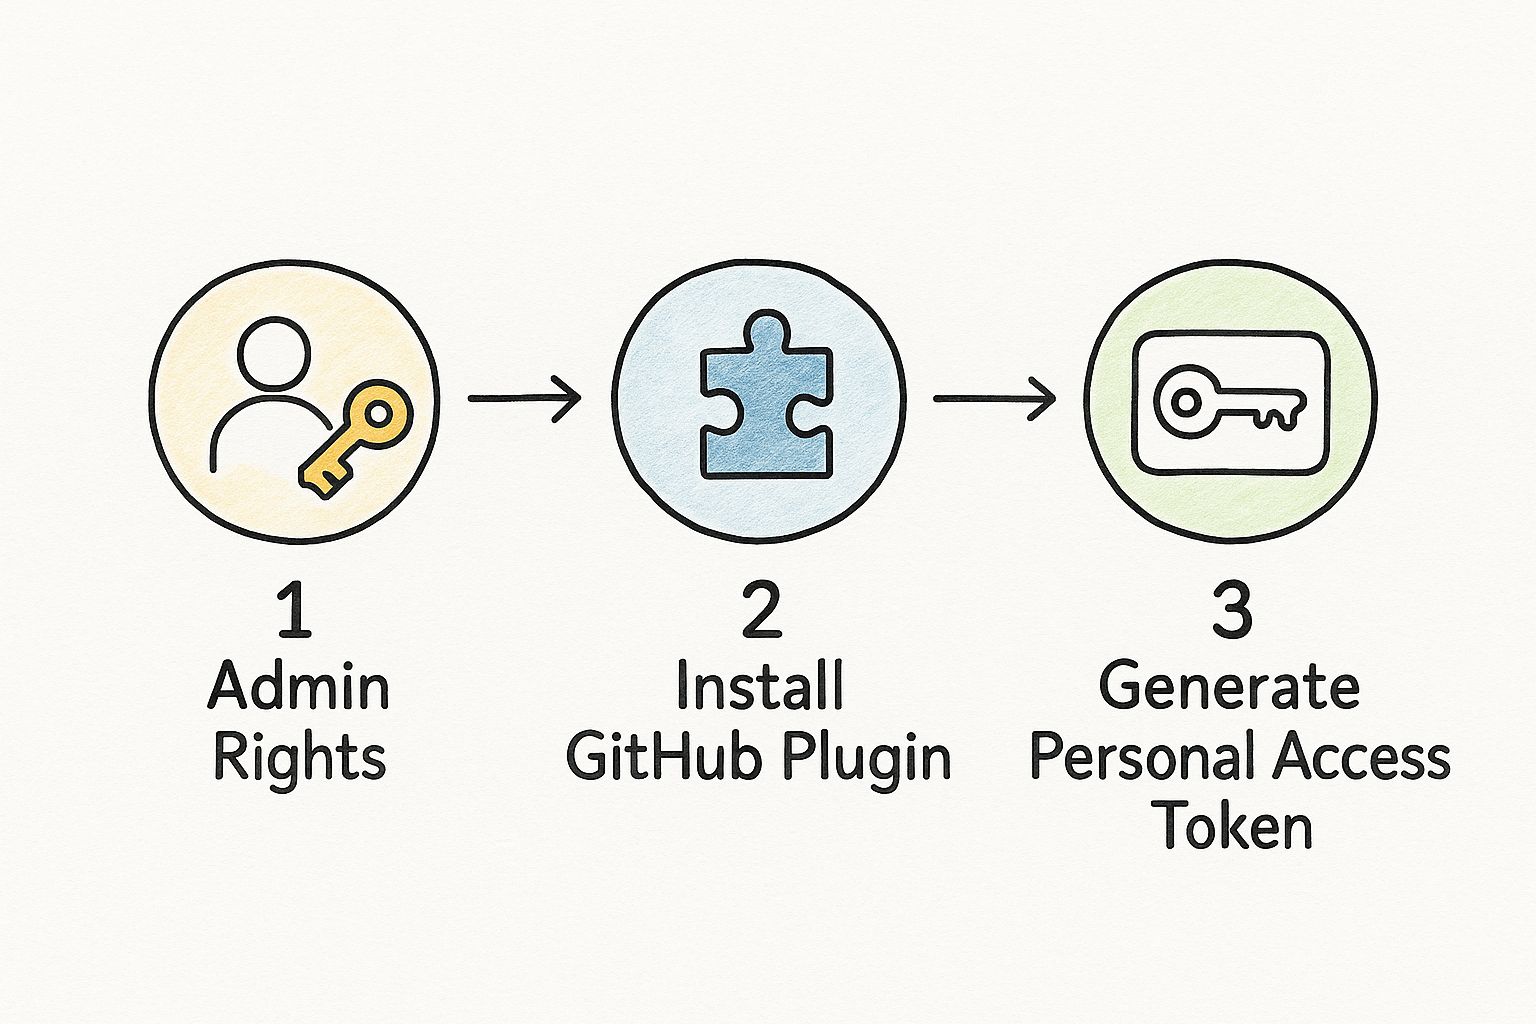
As you can see, the logical flow starts with securing permissions before moving on to installing tools and creating the credentials that tie everything together.
Verifying Admin Permissions
First things first: you need the right administrative rights on both platforms. Without them, you'll hit a wall almost immediately.
- In Jenkins: You absolutely need administrator privileges. This lets you install plugins and manage system-wide configurations. If you can't access
Manage Jenkins > Plugins, you don't have the required access. - In GitHub: You must have admin or owner permissions on the specific repository you want to integrate. This is non-negotiable for creating webhooks, which are the notification system that tells Jenkins a change has occurred.
Installing the Official GitHub Plugin
With permissions sorted, the next step is to install the official GitHub Plugin in Jenkins. This plugin is the real engine behind the integration, providing all the core features needed to connect to GitHub repos, trigger builds, and report back statuses.
Head to your Jenkins dashboard and navigate to Manage Jenkins > Plugins. In the "Available plugins" tab, search for "GitHub Plugin" and get it installed. Jenkins will likely need a quick restart to activate it.
This little tool is what enables Jenkins to understand repository structures and even check out specific branches. On that note, if your team juggles a lot of branches, learning how to git fetch all branches can be a major time-saver. Check out the details at: https://articles.mergify.com/git-fetch-all-branches/
Don't underestimate the importance of this plugin. It handles all the complex API communication behind the scenes so you don't have to script it yourself. It's the essential bridge between the two systems.
Generating a GitHub Personal Access Token
Finally, you need a secure way for Jenkins to authenticate with the GitHub API. Using your personal password is a huge security no-no. Instead, we'll create a Personal Access Token (PAT).
Go to your GitHub account settings, then navigate to Developer settings > Personal access tokens > Tokens (classic), and generate a new token. The key here is to grant only the permissions Jenkins actually needs. This is a best practice known as the principle of least privilege.
For a standard CI/CD pipeline, you'll want to select the following scopes:
repo: This gives Jenkins full control of private repositories, which it needs to check out code and update commit statuses.admin:repo_hook: This allows Jenkins to create and manage webhooks on your behalf, which is crucial for automatic build triggers.
Give your token a descriptive name like "Jenkins-CI-Token" and copy it somewhere safe immediately. Once you navigate away from that page, you will not be able to see it again. This token is the secure key that Jenkins will use to interact with your GitHub projects.
Alright, with your environment prepped, it's time to actually build the bridge between Jenkins and GitHub. This is where we get the two systems talking to each other, creating a secure and efficient link that’ll become the backbone of your automated workflow.

The whole process really boils down to three key parts. First, we need to securely stash your GitHub token inside Jenkins. Then, we’ll tell Jenkins how to use that token to talk to the GitHub API. Finally, we'll flip the script and tell GitHub how to ping Jenkins whenever there's new code.
Getting this right is absolutely essential for a stable CI/CD pipeline. Let's dive in.
Securely Storing Your GitHub Token in Jenkins
First things first: your Personal Access Token (PAT) is basically a password. Never, ever store it in plain text in your pipeline scripts or configs. Fortunately, Jenkins has a fantastic Credentials Manager built for exactly this. We'll add your PAT as a Secret text credential.
Head over to Manage Jenkins > Credentials > System > Global credentials (unrestricted). From there, click "Add Credentials" and pick "Secret text" from the dropdown menu.
You’ll see a few fields to fill out:
- Secret: This is where you'll paste your GitHub PAT.
- ID: Give it a unique and memorable name. I like to use something clear like
github-pat-for-cicd. - Description: Add a quick note for your future self or your team, like "GitHub PAT for triggering CI builds."
By storing the token this way, your pipeline scripts can reference it by its ID without ever exposing the actual secret. This isn't just a best practice; it's fundamental for any serious Jenkins GitHub setup.
Using the Jenkins Credentials Manager abstracts away your secrets. If you ever need to rotate the token, you just update it in this one spot instead of digging through dozens of different job configurations. It's a lifesaver.
Configuring the GitHub Plugin
Now that Jenkins has your credentials locked down, you need to tell the GitHub plugin to actually use them. This step effectively registers your Jenkins instance with the GitHub API.
Go to Manage Jenkins > Configure System and find the "GitHub" section. Click "Add GitHub Server" and choose the "GitHub Server" option.
A new configuration block will pop up. Unless you're using GitHub Enterprise, you can leave the API URL as is. The most important part is selecting the credential you just created from the "Credentials" dropdown.
Once you've selected it, hit the "Test connection" button. If you see a success message, you're golden. It means Jenkins is successfully authenticating with GitHub using your PAT.
Setting Up the GitHub Webhook
This is the final, and most active, piece of the puzzle: the webhook. This is how GitHub proactively notifies Jenkins about repository activity, like a code push or a new pull request. Without it, Jenkins would have to constantly poll your repository for changes, which is clunky and inefficient.
GitHub, which launched way back in 2008, is the undisputed king of source code hosting. As of early 2025, it's home to over 100 million developers and more than 420 million repositories. With that kind of scale, webhooks are the only sane way to manage automated workflows.
Jump over to your GitHub repository and navigate to Settings > Webhooks, then click "Add webhook."
Here's what you need to fill in:
- Payload URL: This is your Jenkins server URL, but with
/github-webhook/tacked onto the end. For example:https://your-jenkins-server.com/github-webhook/. - Content type: Make sure this is set to
application/json. - Which events would you like to trigger this webhook? To start, just select "Just the push event." You can always come back and add more later, like pull request events, which are crucial for running checks before merging code.
Once you add the webhook, GitHub will immediately send a test "ping" to Jenkins. If you see a green checkmark next to your new webhook, the connection is live! From now on, every git push to your repository will automatically trigger your Jenkins job.
Creating Your First Automated Jenkins Pipeline
Alright, with all the connections established, it's time for the fun part. This is where we move from configuration to a real, working pipeline that actually responds to your code commits. We're going to set up a new pipeline job in Jenkins and tell it what to do using a Jenkinsfile.
This "pipeline-as-code" approach is the modern way to do things. By keeping the pipeline definition in a file right next to your application code in your GitHub repository, you get version control, easy collaboration, and a single source of truth for your entire build process.
Setting Up the Pipeline Job in Jenkins
Head over to your Jenkins dashboard and click "New Item." Give your pipeline a name that makes sense, like my-app-ci-pipeline, and be sure to select the Pipeline option. This job type is built specifically to work with a Jenkinsfile.
On the next screen, scroll down until you find the "Pipeline" section. This is where you tell Jenkins where to find its instructions. Change the Definition dropdown from "Pipeline script" to "Pipeline script from SCM."
This is a critical step. It tells Jenkins to stop looking for a script pasted into the UI and instead pull a Jenkinsfile directly from your source code repository.
- SCM: Choose Git.
- Repository URL: Paste in the URL of your GitHub repository.
- Credentials: Select the GitHub PAT credential you created earlier from the dropdown.
- Branch Specifier: You can leave this as
*/mainor*/masterfor now.
Jenkins now knows how to grab your code. The only thing missing is the Jenkinsfile itself.
Crafting a Simple and Effective Jenkinsfile
The Jenkinsfile is where the magic happens. It's where you define every single step of your CI process using Jenkins' declarative syntax, which is surprisingly readable and perfect for breaking down your workflow into logical stages.
Go ahead and create a new file named Jenkinsfile (no extension, just that) in the root of your GitHub repository.
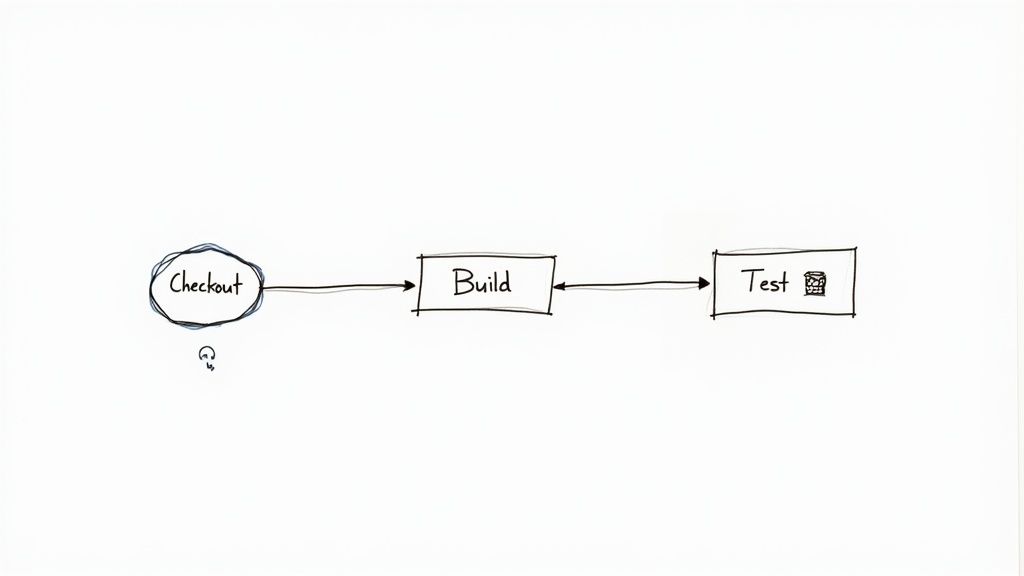
Let's start with a basic but very practical example for a Node.js project. This template outlines the core stages you'll see in almost any CI workflow.
pipeline {
agent any
stages {
    stage('Checkout') {
        steps {
            // This step automatically checks out the code from the repo
            checkout scm
        }
    }
    stage('Build') {
        steps {
            // Example for a Node.js project
            echo 'Building the application...'
            sh 'npm install'
        }
    }
    stage('Test') {
        steps {
            // Run unit tests
            echo 'Running tests...'
            sh 'npm test'
        }
    }
}
}
This structure gives you a clean, logical flow. Each stage is a distinct part of the process—grabbing the code, building it, and testing it. This segmentation makes it incredibly easy to see exactly where something went wrong if a build fails.The table below breaks down these essential stages and their roles in a declarative pipeline.
Essential Jenkinsfile Pipeline Stages
| Stage Name | Purpose | Example Command |
|---|---|---|
| Checkout | Clones the source code from the specified repository onto the Jenkins agent. | checkout scm |
| Build | Compiles the code and installs dependencies. The commands are specific to the project's tech stack. | sh 'npm install' |
| Test | Executes automated tests (unit, integration, etc.) to validate the code changes. | sh 'npm test' |
| Deploy | (Optional) Pushes the built artifact to a staging or production environment. | sh './deploy.sh' |
These stages form the backbone of a solid CI pipeline, ensuring every commit is automatically verified.
Now, commit this Jenkinsfile to your repository. This is the moment of truth. Jump back to your Jenkins job and click "Build Now" to kick it off manually for the first time. You should see the stages light up in the "Stage View" as they execute.
Even better, push a small code change to your GitHub repo. Thanks to the webhook we set up, you'll see your Jenkins pipeline automatically spring to life, validating your change in real-time.
For a deeper look into building more complex and effective workflows, check out this excellent guide on the Jenkins CI/CD pipeline.
Going Pro with Your CI/CD Workflow
Alright, so you've got a basic pipeline up and running. That's a huge first step. But the real magic happens when you move beyond a simple, single-job setup and start building a professional-grade CI/CD process.
This is where you start adopting techniques that seriously improve how your pipeline scales, how quickly you get feedback, and how easy it is to maintain. These next steps are what separate a functional pipeline from a truly efficient, game-changing one. Let's dig into some of the most powerful features the Jenkins GitHub integration has to offer.
Embrace Multibranch Pipelines
If more than one person is working on your project, the multibranch pipeline isn't just a nice-to-have—it's essential. Forget about the old way of manually creating a separate Jenkins job for every single feature branch. That just doesn't scale.
The multibranch feature automatically scans your entire repository for any branch or pull request that contains a Jenkinsfile.
For each one it finds, Jenkins automatically creates and manages a dedicated pipeline job. This is a massive win. A developer can push a new branch, and Jenkins immediately picks it up and starts building and testing it, no manual intervention needed. It completely eliminates the administrative headache of managing dozens of nearly identical jobs.
A multibranch pipeline turns Jenkins from a static build server into a dynamic system that adapts to your team's workflow. It’s the single most impactful feature for scaling your CI process.
Setting one up is straightforward. Just create a new "Multibranch Pipeline" job in Jenkins, point it at your GitHub repository, and let it do its thing. It'll scan the repo and spin up child jobs for every branch it finds.
Send Build Statuses Back to GitHub
One of the best ways to tighten the feedback loop for your developers is to have Jenkins report build statuses directly back to GitHub. This feature puts build results right where your team lives—in the GitHub UI. You'll see that satisfying green checkmark for a successful build or the dreaded red "X" for a failure right next to each commit and inside every pull request.
This immediate, visual feedback is incredibly valuable. Your developers no longer have to jump over to the Jenkins dashboard to see if their changes broke the build. It also lets you enforce quality gates. You can set up branch protection rules in GitHub to block pull requests from being merged if their checks are failing.
To get this working, you'll need to add a post action to your Jenkinsfile. This block will tell Jenkins to update the commit status when the build is done.
post {
always {
// This will run regardless of the build's outcome
updateGitCommitStatus(
status: currentBuild.result,
message: "Jenkins build status"
)
}
}
Manage Secrets and Shared Code Like a Pro
As your pipelines become more complex, you'll quickly run into two common challenges: handling sensitive information and avoiding repetitive code.
- Jenkins Credentials Plugin: We already used this for the GitHub Personal Access Token, but its real power is in managing all your secrets. Think database passwords, API keys, and cloud credentials. These should never, ever be hardcoded in your
Jenkinsfile. Always store them securely in the Jenkins Credentials Manager. - Shared Libraries: Do you have multiple pipelines with similar stages, like a standardized deployment process? Instead of copying and pasting that logic everywhere, extract it into a Shared Library. This is basically a central repository for reusable pipeline code. You can import this library into any
Jenkinsfile, which keeps your pipelines DRY (Don't Repeat Yourself) and makes them vastly easier to update and maintain.
What to Do When Your Jenkins and GitHub Integration Breaks
Even with a perfect setup, your Jenkins-GitHub integration will inevitably hit a bump in the road. It happens to everyone. One minute your pipeline is humming along, the next, it's dead silent after a push.
The good news? It's almost always one of a few usual suspects. Knowing where to look first can save you from hours of painful log-diving and turn a crisis into a five-minute fix.
Is the Webhook Firing?
The most common problem by a long shot is the GitHub webhook not triggering a build at all. You push a commit, you wait... and nothing.
Your first port of call should always be the webhook delivery logs inside your GitHub repository settings. If you see a 403 or 404 error there, you've found your culprit. This usually means a firewall is blocking Jenkins, or you’ve got a typo in the webhook's Payload URL.
Authentication and Checkout Headaches
Another frequent source of frustration is authentication. If your Jenkins build log screams Permission denied (publickey) or could not read Username for 'https://github.com', that’s a dead giveaway.
Your credentials aren't set up right in the Jenkins job. Go back and double-check that the job is actually using the secret text credential that holds your Personal Access Token.
Sometimes the issue is sneakier. The pipeline might kick off but then immediately fail at the checkout stage. This often happens if the token you're using doesn't have the right permissions to pull down the code.
A Tip from Experience: Always, always double-check your GitHub Personal Access Token scopes. The number one reason I see Jenkins fail to clone a private repository is a missing repo scope. It’s an easy mistake to make, even if the main connection test in Jenkins passes.A Quick Diagnostic Checklist
Before you start tearing your hair out and digging through server logs, run through this quick checklist. I'd bet this covers over 90% of the integration problems you'll ever face.
- Webhook Delivery Logs: In GitHub, head to
Repository Settings > Webhooks. Find your Jenkins webhook, click on it, and look at the "Recent Deliveries" tab. Any red, failed deliveries are your starting point. - Jenkins System Log: In Jenkins, navigate to
Manage Jenkins > System Log. This is where you'll find more detailed error messages that might point to a firewall issue or a misbehaving plugin. - Credential Scopes: Pop over to your Personal Access Token settings in GitHub. Does it have both the
repoandadmin:repo_hookpermissions? It needs both to function correctly. - Jenkins Job Configuration: Open the job configuration in Jenkins. Is the "Pipeline script from SCM" section pointing to the correct repository URL? And is it set to use the correct credential?
By methodically checking these four spots, you can almost always find the root of the problem and get your CI/CD pipeline back on track.
Are your CI costs spiraling, or are your developers stuck waiting for builds? Mergify optimizes your entire CI/CD workflow. With intelligent merge queues and CI cost reduction features, Mergify ensures your team ships faster and more reliably. See how Mergify can streamline your development process.


