
A Guide to GitHub Code Owners

So, what exactly is GitHub's CODEOWNERS file? At its core, it’s a simple text file that lives in your repository. Its job is to automatically assign specific developers or entire teams as reviewers for pull requests that touch certain parts of the codebase.
Think of it as an automated routing system for your code reviews. It makes sure the right experts are always looped in, creating clear accountability and streamlining your entire development workflow from start to finish.
Why GitHub CODEOWNERS Is Your Secret Weapon
Imagine a huge, bustling library where anyone can move or replace books without checking with the librarian who specializes in that section. What would you get? Chaos. Misplaced information. A steady drop in quality. A code repository without clear ownership often suffers the exact same fate, and that's precisely the problem GitHub code owners was built to solve.
The CODEOWNERS file acts as your project's team of digital librarians. It’s a powerful yet simple configuration file that maps parts of your repository to the people or teams responsible for them. When a developer opens a pull request that changes files covered by this map, GitHub automatically requests a review from the designated owners. Simple as that.
Moving Beyond Manual Assignment
Without a CODEOWNERS file, the review process is often a manual, error-prone mess. A junior developer might have no idea who the go-to expert is for a specific module. This leads them to either guess, drop a question in a noisy Slack channel, or tag a senior engineer who isn't the right person for the job.
This manual approach creates a few persistent headaches:
- Review Bottlenecks: Pull requests just sit there, gathering dust while waiting for someone to notice them or for the right person to be manually assigned.
- Knowledge Hoarding: Expertise gets siloed with a few key individuals. This creates a massive "bus factor" risk, where project knowledge vanishes if one person goes on vacation or leaves the company.
- Unclear Responsibility: When something inevitably breaks in production, it’s a pain to trace who approved the change or who holds the ultimate responsibility for that part of the code.
By automating the assignment process, the CODEOWNERS file tackles these issues head-on. It codifies your team's knowledge, enforces accountability, and ensures every piece of code gets a second look from the most qualified person.In the end, this feature is so much more than a simple convenience. It's a foundational tool for building a scalable, high-quality engineering culture. It transforms your repository from a collaborative free-for-all into a well-oiled machine where ownership is clear, reviews are efficient, and code quality stays consistently high.
By implementing a CODEOWNERS file, you’re not just organizing your code—you’re empowering your team to ship better software, faster.
The Real Benefits of Using a CODEOWNERS File
Putting a CODEOWNERS file in your repository does a lot more than just automate who gets tagged on a pull request. It’s a genuine shift in your development culture, starting with a powerful sense of accountability.
When developers are formally named as owners, they stop being just contributors and become true stewards of their code. This simple change almost always leads to a natural increase in code quality and a more proactive approach to maintenance. They start thinking about its long-term health, not just the immediate feature.
Supercharge Your Review Cycle
One of the biggest wins is the immediate speed-up of your code review process. No more pull requests sitting in limbo while the author tries to figure out who the right reviewer is. The CODEOWNERS file acts like an intelligent router, instantly notifying the correct experts the moment a PR is opened.
This isn't just a minor convenience; it's a massive efficiency boost. We've seen teams that properly define ownership with GitHub code owners slash their pull request review times by over 30%. You get rid of that initial delay and confusion, which means teams can merge changes faster, shorten feedback loops, and ultimately ship more frequently.
By codifying responsibility, you create a system where expertise is automatically directed where it's needed most. This not only speeds up reviews but also improves their quality, as the right eyes are always on the code.
Create a Living Project Map
Jumping into a large, complex project can feel overwhelming for a new team member. A well-maintained CODEOWNERS file becomes a living, breathing map of the entire codebase, clearly pointing out who is responsible for each piece of the puzzle. It’s an incredible onboarding tool.
Instead of guessing or interrupting a senior dev, a new hire can just check the file to find the go-to person for any part of the application. This drastically shortens their time to productivity and helps them feel like part of the team much faster.
This clarity also strengthens your other repository safeguards. When you pair a CODEOWNERS file with branch protection rules, for example, you create a mandatory quality gate that can’t be bypassed. To see how these features work together, you can explore our guide on GitHub branch protection. This isn't just about adding a feature; it's a strategic move for building a more efficient and stable engineering team.
Mastering the Code Owners File Syntax
To get GitHub code owners working for you, you first need to get comfortable with the CODEOWNERS file itself. It’s just a plain text file, but it uses a simple, rule-based syntax that tells GitHub who’s responsible for what. Think of it as a set of instructions for a digital librarian who automatically knows who to ping for a review.
The file's location actually matters. You can drop it in the root of your repository, tuck it away in a docs/ folder, or place it in the .github/ directory. If you happen to have CODEOWNERS files in more than one of those spots, GitHub has a clear pecking order: it checks .github/ first, then the root, and finally docs/. Most teams just stick with .github/CODEOWNERS to keep things simple and consistent.
The Basic Structure of a Rule
Every line in the file defines a single ownership rule. The format couldn't be simpler: a file path pattern followed by one or more owners. An owner can be a GitHub username or a team name—just make sure to prefix it with an @.
This is a comment. Lines starting with # are ignored.
Pattern Owner(s)
/apps/api/ @backend-team @security-lead
*.js @frontend-team
docs/README.md @alice @bob
The real power of the CODEOWNERS file comes from its specificity and order. GitHub reads the rules from top to bottom, and the last matching pattern for any given file is the one that wins. This is a game-changer because it lets you set broad, general ownership rules at the top and then carve out specific exceptions for certain files or subdirectories further down.
The infographic below nails this concept, showing how a general rule gets overridden by more specific ones down the line.
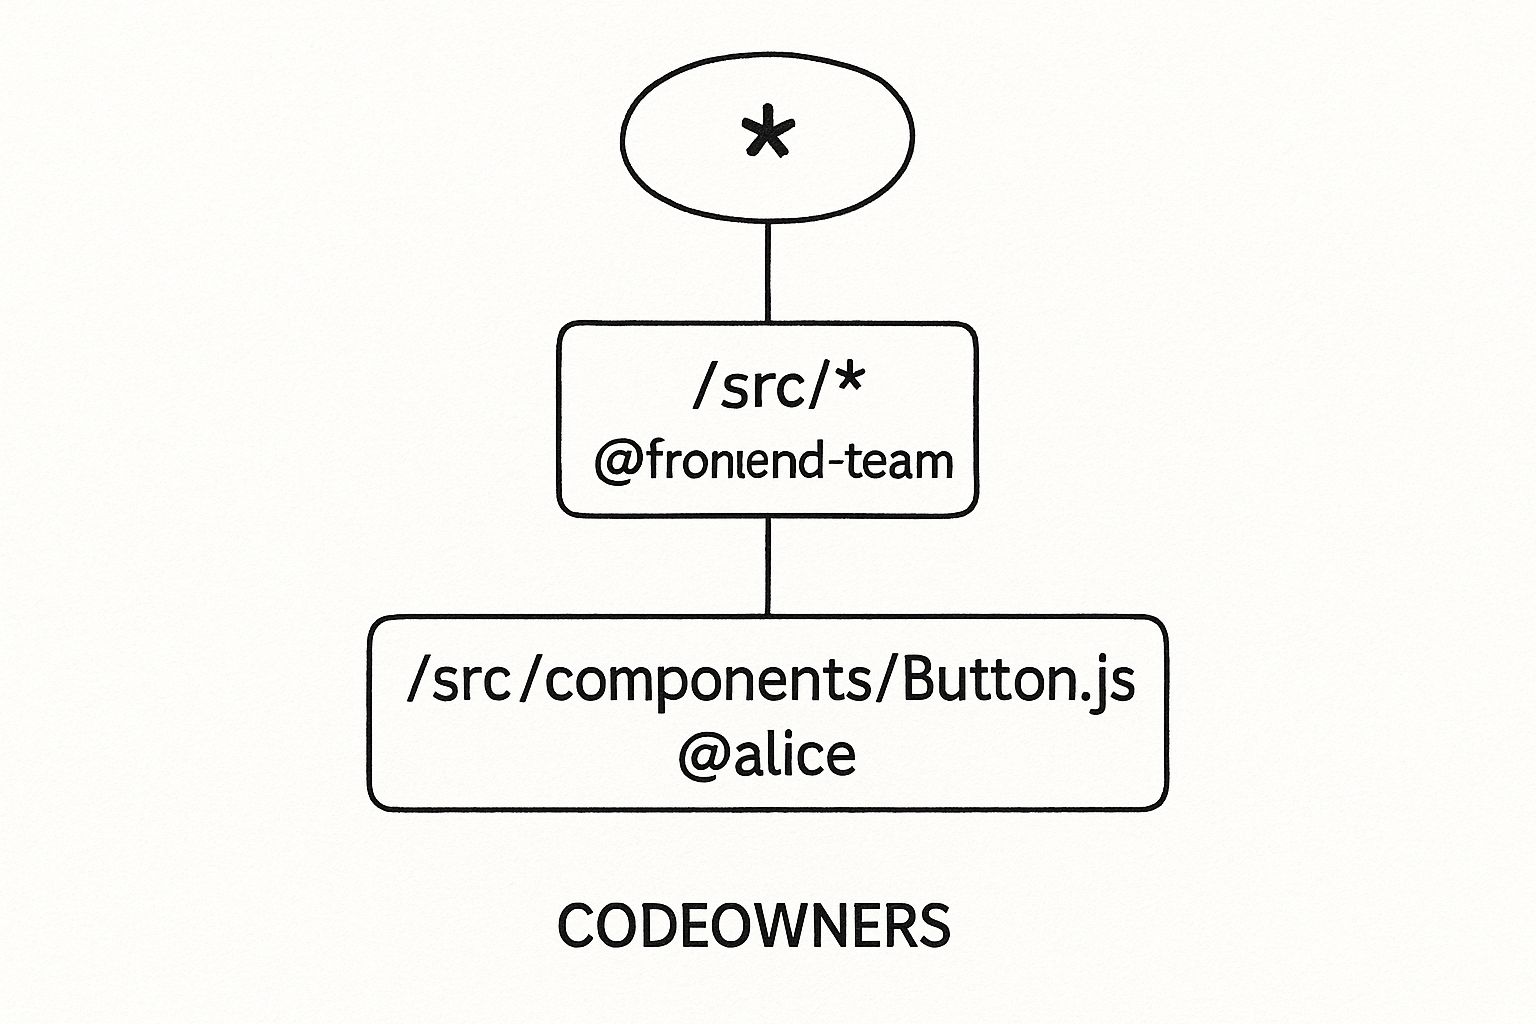
As you can see, a global owner for all files (*) can be superseded by a team for a whole directory (/src/*), and finally by a single expert for one specific component (/src/components/Button.js). It's all about that last match.
Code Owners Syntax Quick Reference
You don't have to list every single file path. The CODEOWNERS syntax supports wildcards and other patterns that make the rules flexible and easy to manage. Getting these patterns right is key to building a low-maintenance, high-impact ownership strategy.
Here’s a quick cheat sheet for the most common patterns you'll find yourself using.
| Pattern | Description | Example Owner(s) |
|---|---|---|
* |
Matches every file in the repository. Often used as a catch-all at the top of the file. | @senior-devs |
*.js |
Matches any file ending with the .js extension, regardless of its location. |
@frontend-team |
docs/ |
Matches everything inside the docs/ directory. |
@documentation-writers |
/build/ |
Matches the build directory only at the root level. |
@devops-team |
libs/**/ |
Matches all files and folders nested anywhere inside the libs directory. |
@platform-squad |
foo/bar.go |
Matches a specific file at an exact path. | @alice |
Mastering these simple patterns gives you a ton of control, letting you assign ownership from the broadest strokes down to the finest details.
A key principle to remember is that ownership requires permission. Designated owners must have write access to the repository for their assignment to be valid. This ensures that only trusted contributors can approve changes in critical areas.
For this whole system to work, both the individual users and the teams you list as owners need the right permissions in the repository. This isn't just a suggestion; as GitHub's official documentation explains, it’s a core part of the security model that powers required reviews. It's what prevents pull requests from being merged until an authorized owner gives their stamp of approval, making the CODEOWNERS file a reliable gatekeeper for your codebase.
How to Set Up Your First Code Owners File
Alright, let's move from theory to practice. Getting your first CODEOWNERS file up and running is surprisingly straightforward. In just a few minutes, you can bring a whole new level of clarity to your review process.
Here’s a quick walkthrough to get it done right. We'll create the file, define a simple rule, and then test it out with a pull request to see it in action.
Step 1: Create the CODEOWNERS File
First thing's first: you need to create the CODEOWNERS file in the right spot. While GitHub lets you place it in the root or docs/ folder, the community standard—and frankly, the best practice—is to put it inside the .github/ directory.
- Head over to your repository on GitHub.
- Click the "Add file" button, then choose "Create new file."
- In the file name box, type
.github/CODEOWNERS. This nifty trick creates the folder and the file all at once.
Putting it here keeps all your repository's configuration files neatly organized in one place. It’s just cleaner, and it's what most dev teams do.
Step 2: Write Your First Ownership Rule
With the file created, it's time to add your first rule. Let's keep it simple for now. Pick a critical or frequently changed part of your codebase—something like the API directory is a perfect candidate—and assign an owner.
In your new CODEOWNERS file, just add this single line:
/src/api/ @my-org/backend-team
This one line tells GitHub a simple, powerful instruction: any changes to any file inside the /src/api/ directory must get a review from the @my-org/backend-team. Using a team here instead of a single person is a pro move; it prevents bottlenecks if someone is on vacation or swamped.
A key thing to remember: the last matching pattern always wins. This means you can start with broad rules at the top and then get more specific for sub-folders or individual files further down as your project grows.
Once you’ve added your rule, go ahead and commit the new CODEOWNERS file directly to your main branch.
Step 3: Test Your New Rule
Now for the fun part—seeing your automation actually work.
To test the setup, create a new branch and make a tiny change to any file inside /src/api/. It can be as simple as adding a comment.
Once you commit the change, open a new pull request. The moment you create it, you'll see the magic happen. To get a better handle on all the stages of this process, you can check out our detailed guide on the GitHub pull request lifecycle.
The screenshot below shows exactly what you should expect to see on the right-hand side of your new pull request.
Just like that, GitHub has automatically tagged the backend-team as a required reviewer, all based on the rule you just wrote. Your system is now live, ensuring the right experts are always pulled into the conversation without anyone having to lift a finger.
Advanced Strategies and Best Practices
Once your CODEOWNERS file is in place, you can go way beyond basic assignments and start using the kinds of advanced tactics high-performing teams rely on. The single most powerful move? Integrating GitHub code owners with your branch protection rules to create an unskippable quality gate.
Go into your settings for a critical branch like main and enable "Require a pull request before merging" and, crucially, "Require review from Code Owners." Just like that, you've made owner approval mandatory. This simple change ensures no code can slip into production without a sign-off from the designated expert, effectively hard-coding your review policy right into your repository's workflow.
Using Tiered Ownership for Precision
One of the most effective techniques is creating a tiered ownership structure. The CODEOWNERS file is read from top to bottom, but the last matching rule for a specific file always takes precedence. This little detail is incredibly powerful. It means you can set broad, general ownership at the top of the file and then get more granular with specific overrides further down.
For example, you could assign an entire application directory to a senior team, then assign specific, critical components to the individual developers who know them inside and out.
apps/billing/ @platform-team# Broad ownershipapps/billing/payment-processor.js @alice# Specific override
This tiered approach ensures that while the whole team has a sense of responsibility, the most relevant expert is always looped in for critical changes. It’s the perfect blend of general oversight and specialized review.
The core idea is to treat your CODEOWNERS file not as a static list, but as a dynamic map of your team's expertise. As your project evolves, this file should evolve with it, reflecting changes in responsibility and team structure.
Managing Ownership at Scale
As projects get bigger, just managing ownership can become a job in itself. What do you do with shared concerns like CI/CD configurations in the .github/workflows/ directory or the global documentation? The smart move is to assign these to cross-functional or platform teams.
.github/workflows/ @devops-teamdocs/ @documentation-guild
This setup prevents a single feature team from becoming a bottleneck for changes that affect everyone. For massive monorepos, this strategy isn't just nice—it's essential. Just look at GitHub's own primary codebase, a Ruby on Rails monolith with over 4.2 million lines of code. It scaled beyond a single CODEOWNERS file by adding a SERVICEOWNERS layer for more flexible grouping. You can learn more about how GitHub organizes its massive codebase and see these principles applied at an extreme scale.
Automating these advanced workflows is the final piece of the puzzle. Pairing your CODEOWNERS file with a merge queue, for example, can create a highly efficient, hands-off pipeline. You can take your repository management to the next level by learning more about automating your pull request workflow. By combining clear ownership with smart automation, you can maintain both order and quality, no matter how complex your repository becomes.
Frequently Asked Questions
As you start weaving the GitHub code owners feature into your daily workflow, you're bound to run into some specific questions and odd edge cases. This section is your go-to guide for clear answers on the most common puzzles, helping you sort out those tricky situations with confidence. Let's get into the details you'll most likely face.
What Happens If a Code Owner Is Unavailable?
This is probably one of the most critical things to plan for if you want to keep work flowing smoothly. If you assign ownership to just one person and they're on vacation, out sick, or even leave the company, any pull request needing their sign-off is dead in the water. That's a surefire way to bring your entire development pipeline to a screeching halt.
The best way to sidestep this bottleneck is to assign ownership to a GitHub team, like @my-org/backend-team. This creates built-in redundancy right away. Any member of that team can approve the pull request, so development never gets held up waiting for a single person. Plus, when someone leaves, you just update the team's roster instead of hunting down and editing every mention of their username in the CODEOWNERS file.
Can I Require Multiple Approvals?
The CODEOWNERS file itself doesn't have a special syntax for demanding multiple approvals. If you have a rule like *.js @alice @bob @charlie, a single approval from either Alice, Bob, or Charlie is all it takes to satisfy that rule.
To enforce multiple approvals, you need to combine your CODEOWNERS file with GitHub's branch protection rules. It’s a two-step process:
- Head over to your repository’s Settings > Branches.
- Add or edit a protection rule for your target branch (like
main). - Check the box for "Require a pull request before merging."
- Then, enable "Require approvals" and set the number to whatever you need, like 2.
This setup creates a much stronger quality gate. Even after the code owner gives their thumbs-up, the pull request still needs a second review from another team member before it can be merged.
How Does This Feature Work with Monorepos?
The CODEOWNERS file is practically essential for managing large monorepos where different teams all work in the same repository. You can use a single, central file in the root .github/ directory to map out ownership across all the different projects, apps, and shared libraries. It becomes the single source of truth for who owns what.
For instance, you can structure your file to route reviews to the right people automatically:
apps/web-app/ @frontend-teamapps/mobile-app/ @mobile-teamlibs/database/ @data-teamlibs/auth/ @security-team
This is incredibly effective because it cuts down on notification noise. A change to the mobile app’s code will only ping the mobile team, not the entire engineering organization. The "last matching pattern takes precedence" rule is a huge help here, as it lets you set broad ownership at the top and then carve out specific exceptions for sub-folders.
Quick heads-up: As of May 20, 2025, GitHub will retire thedependabot.ymlreviewers option. This makesCODEOWNERSthe one and only way to manage reviewers for both human and Dependabot pull requests, simplifying your configuration and making a well-keptCODEOWNERSfile more important than ever.
Should I Use Comments in My Code Owners File?
Yes, absolutely. As your repository and team scale, your CODEOWNERS file will get more complicated. Using comments (any line starting with a #) and blank lines is a critical best practice. It keeps the file readable and much easier to maintain over time.
Think of comments as documentation for your future self and for new hires. They’re perfect for:
- Explaining tricky rules: Add a quick note about why a specific person or team owns a critical file.
- Grouping related sections: Use headers like
# === API Services ===or# === Shared Libraries ===to organize rules logically. - Leaving temporary notes: You can add a
# TODO:to remind the team to update ownership after a big refactor.
A well-commented file is easier to debug and less prone to accidental mistakes, making it a key part of any scalable ownership strategy.
At Mergify, we help you automate these complex workflows. Our merge queue and CI optimization tools work seamlessly with your CODEOWNERS setup to ensure your codebase remains stable and your team stays productive. See how you can take control of your merge process at https://mergify.com.


