
How to Apply a Patch A Developer's Guide

When you need to apply a patch, you're essentially using a command like git apply or patch to integrate a set of code changes into your project. The patch itself is just a file—a precise set of instructions for updating code from one version to another, which is a lifesaver for collaboration and bug fixes.
Why Patches Are a Developer's Secret Weapon
Before we jump into the commands, let's talk about why patches are so fundamental. At its heart, a patch file just details the differences between two versions of your code. Think of it as a blueprint for a specific change, letting you share updates without needing direct commit access to a repository.
This isn't just some niche technical task; it's a cornerstone of modern, collaborative coding. The proof is in the numbers: the global patch management market was valued at USD 660.3 million in 2022 and is on track to hit USD 1.45 billion by 2030. You can dig into the full market analysis from Fact.MR for more on that trend.
When Do You Actually Use a Patch?
Patches really shine in a few common, real-world situations. To get the full picture, a solid understanding of patch management is a great starting point.
Here are a few scenarios where I find them indispensable:
- Contributing to Open-Source: Ever wanted to fix a bug in a project on GitHub where you don't have write access? You can create a patch. This gives the maintainers a clean, ready-to-apply solution they can easily review and merge.
- Sharing Experimental Code: Let's say you're working on a wild new feature with a teammate but aren't ready to push it to a shared branch. Just send them a patch file. They can apply it locally to test your changes in their own environment without cluttering up the main repo.
- Rolling Out Security Fixes: When a critical vulnerability pops up, a patch can be distributed almost instantly. This secures systems without forcing everyone to go through a full, potentially disruptive, software update.
When you start seeing patches through the lens of collaboration and security, the "how-to" becomes much more intuitive. It’s not just about running a command; it’s about managing change safely and effectively.
Before you can apply a patch, you obviously need to create one first. This is all about capturing your code changes in a standardized format that anyone can use, whether they're on your team or across the world. The two workhorses for this job are git diff, which is perfect for any project under version control, and the classic diff command for everything else.
The concept is pretty straightforward: you're just telling a tool to compare two versions of your code and spit out a file detailing the differences. It might sound simple, but this is the fundamental process that has powered massive collaborative projects, like the Linux kernel, for decades.
Generating a Patch from Git Changes
When your project is already in Git, git diff is your best friend. It’s incredibly powerful and lets you create patches from various points in your development workflow.
Let's say you've made some changes and staged them with git add. If you want to create a patch that only contains those staged changes, you can run this:
git diff --staged > my-feature.patch
This command looks at the difference between what's in your staging area and your last commit (HEAD), then neatly packages it into a new file called my-feature.patch.
What if you want to create a patch from a specific, already-existing commit? No problem. To grab the changes from the most recent commit, you’d use:
git diff HEAD~1 HEAD > last-commit.patch
Here, you're comparing the latest commit (HEAD) with its direct parent (HEAD~1), giving you a precise record of that single update. It’s a clean and effective way to isolate a specific set of changes.
Pro Tip: Sometimes, whitespace changes can really clutter up a patch file, making it a nightmare to review the actual code logic. To generate a cleaner, more focused patch, you can learn how to make git diff ignore whitespace. It's a great trick for keeping your patches focused on what matters.Using Diff for Non-Git Projects
But what if you're not working inside a Git repository? The old-school diff command is still a fantastic tool for the job. Imagine you have two separate directories: one called original-version and another, modified-version.
To create a patch file that captures every single difference between them, you would use this command:
diff -Naur original-version modified-version > project-updates.patch
Let's quickly break down what those flags are doing:
- -N: This tells
diffto treat files that are missing in one directory as if they were empty. It's crucial for including brand-new files in your patch. - -a: Forces
diffto treat all files as text. - -u: This is the important one. It generates the output in the "unified" diff format, which is the industry standard.
- -r: Makes the comparison recursive, so it dives into all the subdirectories.
The result is a clean, standard patch file, ready to be shared and applied. It just goes to show you don't always need a fancy version control system to manage and share changes effectively.
Applying Patches to Your Codebase
Alright, you've got your patch file in hand. Now for the fun part: actually getting those changes into your project. This is where you breathe life into that bug fix or new feature. For this job, you've got two main tools in your belt: git apply, the modern approach for anyone living in a Git world, and the classic patch command, a trusty workhorse that's been around for decades.
So which one should you use? It really depends on your situation. If you’re working inside a Git repository—which is most of us these days—git apply is almost always the way to go. It’s built to play nicely with Git's internal plumbing and has some great safety features, like the ability to do a dry run. This lets you spot potential conflicts before you've made a mess of your working directory.
This simple flowchart shows how you get from a bunch of code changes to a neat, portable patch file.
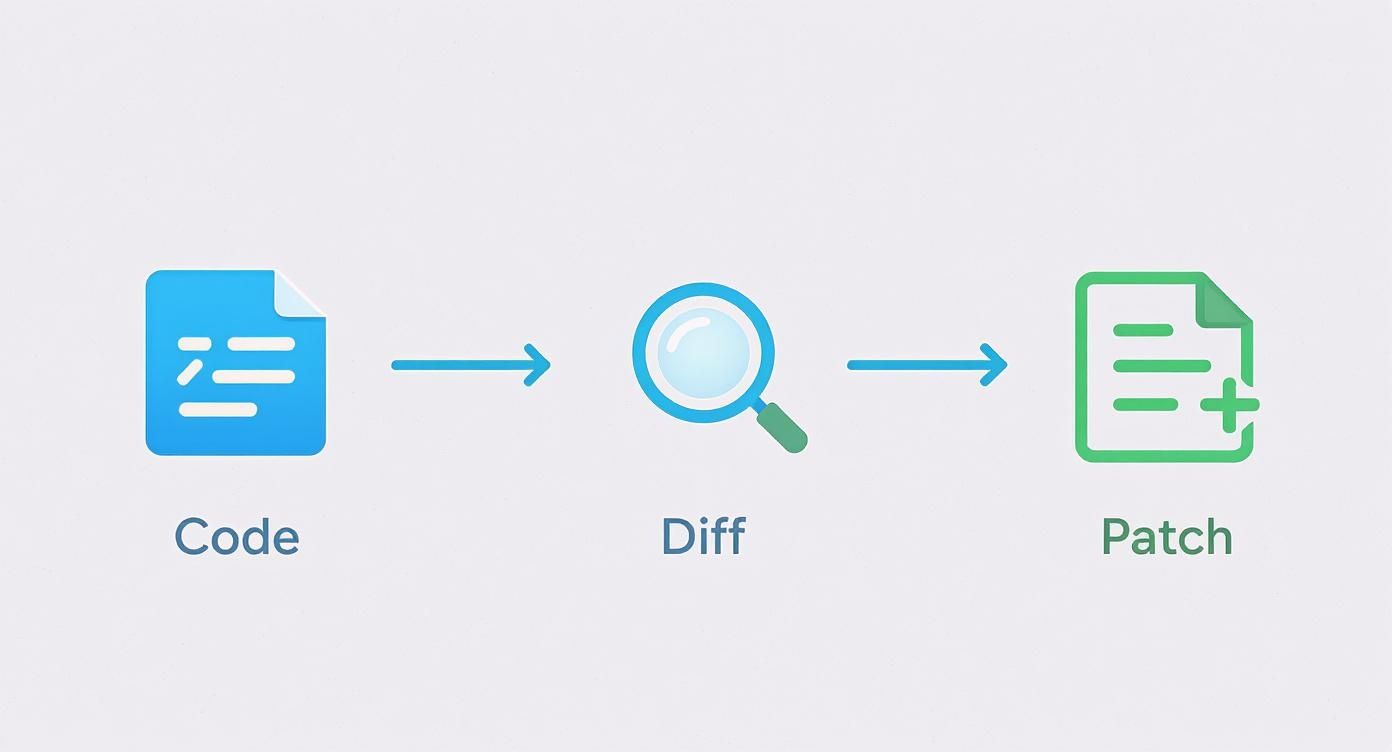
As you can see, creating a patch is really just about capturing the difference between two states of your code in a format that anyone (or any machine) can understand.
Using Git Apply for a Safe Check
One of the best things about git apply is its "dry run" capability. Think of it as a dress rehearsal for your code changes. It simulates applying the patch without actually touching a single file, giving you a heads-up if things are about to go sideways. It's a lifesaver.
To run this check, just use the --check flag:
git apply --check my-fix.patch
If the command runs silently and returns nothing, you're golden. That means the patch will apply cleanly. If it spits out errors, you know you've got some conflicts to sort out first. This simple step can save you from the headache of a partially applied patch that leaves your project in a confusing, broken state.
The Classic Patch Command
For projects that aren't in Git or for patches generated with the standard diff tool, the patch command is your go-to. It's incredibly reliable, though sometimes it needs a little nudge in the right direction, especially when it comes to file paths.
A super common scenario is trying to apply a patch that was created at the root of a project. The file paths inside the patch might look something like a/src/main.js. To get the patch command to find the right file, you need to tell it to ignore that leading a/ directory.
You can do this with the -p1 option:
patch -p1 < project-updates.patch
The -p1 flag is a small but mighty option that solves the vast majority of "file not found" errors when using the patch command. It’s a trick of the trade that makes working with standard patches much more predictable.The ability to patch software reliably isn't just a developer convenience; it's a massive deal for enterprise security and the broader economy. In the United States alone, the patch management market is projected to hit USD 260.1 million in 2024 and is expected to balloon to over USD 551.3 million by 2034. You can dig into the numbers in the full market analysis. This growth just goes to show how fundamental effective patching is to the entire software world.
Git Apply vs Patch Command Comparison
Feeling torn between git apply and the classic patch command? Both are great tools, but they shine in different situations. Here's a quick reference guide to help you choose the right one for the job based on your project's context and what you need to accomplish.
| Feature | git apply | patch Command |
|---|---|---|
| Primary Use Case | Within Git repositories | General-purpose, system-wide |
| Safety Checks | Built-in --check for dry runs |
No built-in dry run feature |
| Path Handling | Intelligently handles paths | Often requires -p flag to strip prefixes |
| Git Integration | Works directly with the Git index | Not Git-aware; modifies files directly |
| Error Handling | Better at handling whitespace errors | More literal, can fail on minor diffs |
| Best For | Applying patches to a Git project | Patches from diff or non-Git sources |
Ultimately, if you're in a Git repo, stick with git apply. Its safety features and deep integration make it the superior choice. But for everything else, the battle-tested patch command is a reliable tool that will never let you down.
Solving Common Patching Problems
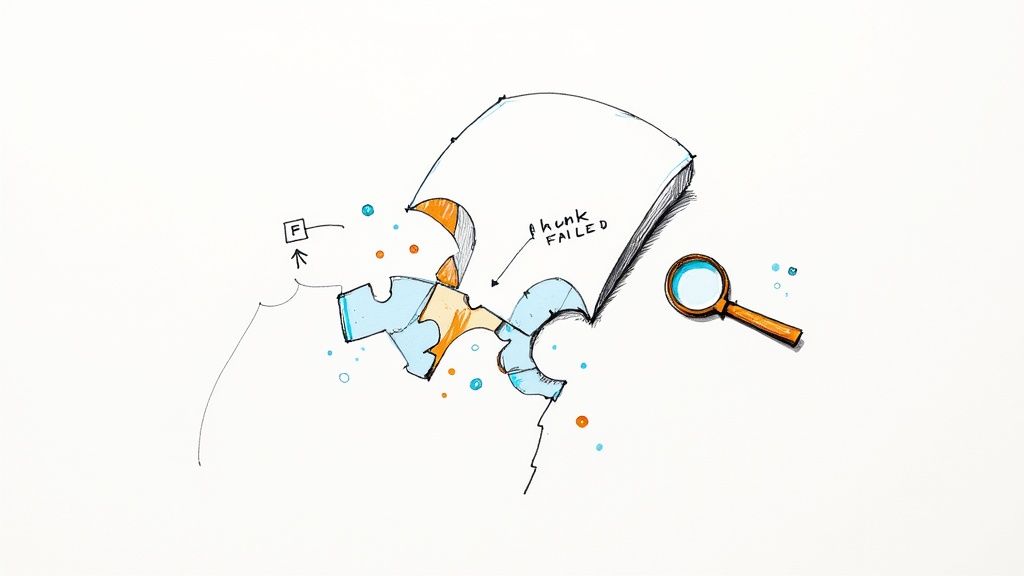
Even with the best tools, applying a patch can sometimes hit a snag. We've all been there: you run git apply and get slapped with the dreaded "hunk failed" message. It’s a classic sign that the code you're trying to patch has drifted too far from the original code the patch was based on.
This mismatch is the root of most patching headaches. It crops up when the lines of code surrounding your change no longer match what's in your current working directory. The patch tool gets confused and simply can’t find the right place to insert its changes.
Navigating Failed Hunks
When you see a Hunk #1 FAILED error, don't panic. Git is pretty helpful here. It will usually create a .rej (rejected) file. This file contains the pieces of the patch—the "hunks"—that it couldn't apply automatically, giving you a clear roadmap of what needs to be fixed by hand.
Your job now is to open the target file and the .rej file side-by-side. You'll need to manually weave the changes from the rejected hunk into your source file. It takes a bit of focus, but it’s a core skill for anyone who regularly works with patches.
The most common cause of a failed patch is a seemingly minor change, like a colleague refactoring a nearby line of code. This is why running git apply --check first is always a good habit—it spots these issues before they create a mess.Taming Whitespace and Path Issues
Beyond direct code conflicts, two other common culprits can stop a patch in its tracks. Getting a handle on them will save you a ton of time and frustration.
- Whitespace Errors: Sometimes a patch will fail just because of trailing whitespace or different line endings (CRLF vs. LF). It's incredibly frustrating, but thankfully, there's an easy fix. Using
git apply --ignore-whitespacecan often resolve these issues instantly. - Path Mismatches: If the patch was created in a different directory structure, you might get "file not found" errors. The
patch -p1command is the standard way to handle this. It just strips the leading directory component from file paths in the patch, letting the tool find the right files.
Manually fixing these issues can feel a lot like dealing with a standard Git merge conflict. If you find yourself in a complex situation, brushing up on your conflict resolution skills is a huge help. For a deeper dive, our guide on how to resolve Git merge conflicts provides a great foundation for tackling these manual fixes.
Let's be real—manually applying patches is fine when you're dealing with a one-off fix. But it just doesn't fly in a busy development environment. To build a workflow that actually scales, you have to bring in automation. This is how you transform a simple patching task into a robust, hands-off process that gives your team their time back.
Modern DevOps tools are built for exactly this kind of problem. A platform like Mergify, for instance, can be set up to automatically apply patches from pull requests the moment they meet your team's criteria. This moves the responsibility off an individual developer's plate and onto an automated system that never gets distracted.
Setting Up Automated Patching
The real power here is in crafting rules that match your team's quality standards. You can build a workflow that only applies a patch after it’s passed a gauntlet of critical checks.
- Green CI Checks: The first gate. The patch has to pass all continuous integration tests to prove it isn’t introducing any regressions.
- Code Review Approvals: You can require at least one or two teammates to sign off on the changes before they go in.
- No Active Conflicts: The automation can double-check that the patch applies cleanly against the target branch before even attempting a merge.
This kind of automation is a huge win for both security and operational efficiency. It's no surprise that the market for patch and remediation software is expected to jump from USD 1.7 billion in 2025 to a whopping USD 7.5 billion by 2035. If you're curious, you can dig into the full market research to see the trend.
Automating patch application slashes the risk of human error and frees up your developers to build features, not babysit routine updates. It turns your CI/CD pipeline into a proactive gatekeeper for code quality.
By stringing these automated checks together, you get a reliable system that integrates critical fixes faster and, more importantly, safer. For teams on GitHub, figuring out how to set up the right triggers is a huge part of this puzzle. To get a head start, check out our guide on mastering GitHub Actions triggers.
Got a question about patching? You're not alone. When you're juggling different tools and trying to get a fix in place, a few common questions always seem to pop up. Getting these details right can save you a lot of headaches and keep your workflow smooth.
Let's clear up some of the most frequent points of confusion.
What’s the Real Difference Between git apply and git am?
This one trips people up all the time. On the surface, they both seem to apply patches, but they serve very different purposes.
Think of git apply as the simple, no-frills option. It’s a lot like the classic patch command. It takes a patch file and just modifies the files in your working directory. That’s it. It doesn't create a commit, which is actually super useful when you just want to test out a change before you commit to it.
On the other hand, git am is designed for a more formal workflow. It takes patches created by git format-patch and does more than just change files—it creates a brand new commit for each patch it applies. Crucially, it preserves the original author and commit message. This makes it the perfect tool for when a contributor sends you a series of commits as patch files and you want to integrate them into your history properly.
Can I Use Patches Across Different Version Control Systems?
What if someone sends you a patch from an old SVN project? Can you use it on your Git repo?
Absolutely. At its core, a standard patch is just a text file that describes changes line by line, so it's mostly agnostic about where it came from. You can usually feed it right into patch or git apply without a problem.
The most common snag you'll hit is with file paths. Sometimes the directory structure in the patch file doesn't quite match your project. This is often an easy fix, though. The -p1 option is your best friend here—it tells the command to strip the first leading directory from the file paths in the patch, which usually gets things to line up perfectly.
Tired of babysitting your pull requests? Mergify can automate your entire workflow, from running checks to merging code. Free up your developers to do what they do best and start merging faster and with more confidence. See how Mergify can streamline your CI/CD pipeline.


